使用scrollX,scrollY和Scroller自定义ViewPager
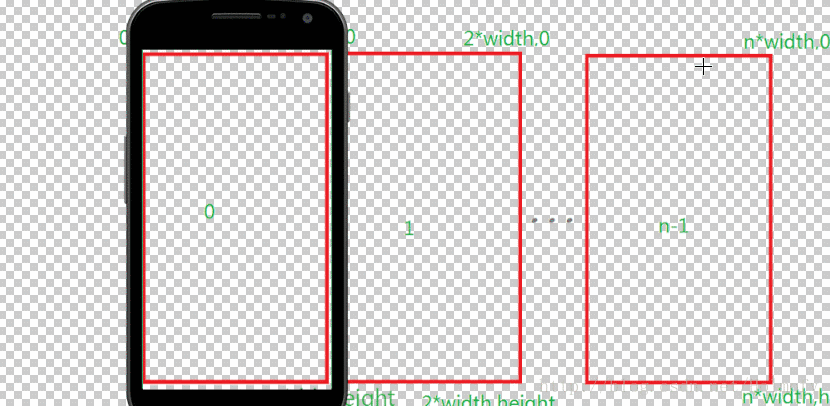
原理介绍 废话不多说先上图。
ViewPager就是包裹了n个宽高与自己相同的子页面,然后通过滑动内部子页面来达到左右页面切换效果。需要注意的是上图中width,height都是指ViewPager的宽高。
继承ViewGroup并实现onLayout方法 在layout方法中我们首先要对子页面进行布局定位。在加上上一次我们实现内容滑动使用的scrollX属性
1
2
3
4
5
6
7
8
9
10
11
12
13
14
15
16
17
18
19
20
21
22
23
24
25
26
27
28
29
30
31
32
33
34
35
36
37
38
39
40
41
42
43
44
45
46
47
48
49
50
51
package cn.hufeifei.scrollertest.view;import android.content.Context;import android.util.AttributeSet;import android.view.MotionEvent;import android.view.ViewGroup;public class MyViewPager extends ViewGroup { public MyViewPager (Context context) { this (context, null ); } public MyViewPager (Context context, AttributeSet attrs) { this (context, attrs, 0 ); } public MyViewPager (Context context, AttributeSet attrs, int defStyleAttr) { super (context, attrs, defStyleAttr); } @Override protected void onLayout (boolean changed, int l, int t, int r, int b) { int childCount = getChildCount(); int width = r - l; int height = b - t; for (int i = 0 ; i < childCount; i++) { getChildAt(i).layout(width * i, 0 , width * (i + 1 ), height); } } private float lastX; @Override public boolean onTouchEvent (MotionEvent event) { switch (event.getAction()) { case MotionEvent.ACTION_DOWN: lastX = event.getX(); break ; case MotionEvent.ACTION_MOVE: float currX = event.getX(); scrollBy((int ) (lastX - currX), 0 ); lastX = currX; break ; } return true ; } }
在布局文件中使用我们定义的MyViewPager类
1
2
3
4
5
6
7
8
9
10
11
12
13
14
15
16
17
18
19
20
21
22
23
24
25
26
27
28
29
30
31
32
33
34
35
36
37
<?xml version="1.0" encoding="utf-8" ?> <RelativeLayout xmlns:android ="http://schemas.android.com/apk/res/android" xmlns:tools ="http://schemas.android.com/tools" android:layout_width ="match_parent" android:layout_height ="match_parent" tools:context ="cn.hufeifei.scrollertest.MainActivity" > <cn.hufeifei.scrollertest.view.MyViewPager android:layout_width ="match_parent" android:layout_height ="match_parent" > <TextView android:layout_width ="match_parent" android:layout_height ="match_parent" android:background ="#f99" android:gravity ="center" android:text ="0" android:textSize ="30sp" /> <TextView android:layout_width ="match_parent" android:layout_height ="match_parent" android:background ="#9f9" android:gravity ="center" android:text ="1" android:textSize ="30sp" /> <TextView android:layout_width ="match_parent" android:layout_height ="match_parent" android:background ="#99f" android:gravity ="center" android:text ="2" android:textSize ="30sp" /> </cn.hufeifei.scrollertest.view.MyViewPager > </RelativeLayout >
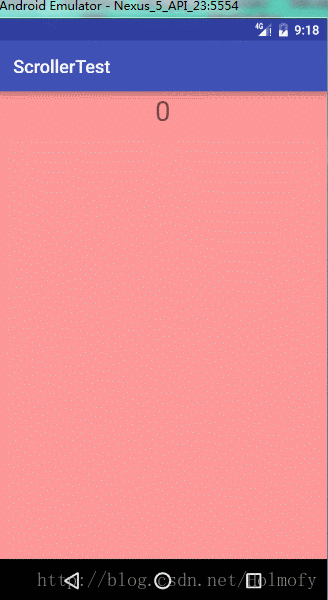
运行效果图如下:
问题解决 1、滑动越界问题 很显然我们在滑动的过程中应该对滑动边界进行判断,也就是在case MotionEvent.ACTION_MOVE:中判断滑动的位置有没有超过所有的页面的总宽度。
2、用户停止移动后的定位问题 在case MotionEvent.ACTION_UP:中我们应该判断,如果用户最后停止触摸的位置小于当前所在子页面宽度的一半,应该向左定位到当前子页面;如果用户最后停止触摸的位置大于当前所在子页面宽度的一半,应该定位到下一个子页面。而且在用户释放触摸后,页面应该平滑地滑动到所要定位的子页面,否则会给用户一种突兀感,这里我们可以有很多解决方法,也许你第一个想到的是使用属性动画,其实安卓已经提供给我们一个用来实现View平滑滚动的一个工具类—-Scroller。它是专门为自定义view的滑动效果设计的,与之类似的还有一个类–OverScroller,在这里我们使用Scroller来解决我们的问题
Scroller详解 官方文档是这样解释的:
大致的意思是:这个类封装了滑动效果,我们能使用Scroller或者OverScroller来收集并处理一些数据来达到滑动动画的效果,随着时间推移Scroller会反馈给我们滑动的偏移量,但是它并不能自动将滑动的偏移量应用到View上,需要我们自己来将它计算出的数据应用到View上达到平滑动画的效果。
英语比较渣,大概意思也能看懂。
1
2
3
public Scroller (Context context) ;public Scroller (Context context, Interpolator interpolator) ;public Scroller (Context context, Interpolator interpolator, boolean flywheel) ;
Scroller会默认提供给我们一个插值器,我们也不用处理fling手势
详细代码 1 2 3 4 5 6 7 8 9 10 11 12 13 14 15 16 17 18 19 20 21 22 23 24 25 26 27 28 29 30 31 32 33 34 35 36 37 38 39 40 41 42 43 44 45 46 47 48 49 50 51 52 53 54 55 56 57 58 59 60 61 62 63 64 65 66 67 68 69 70 71 72 73 74 75 76 77 78 79 80 81 82 83 84 85 86 87 88 89 90 91 92 93 94 package cn.hufeifei.scrollertest.view;import android.content.Context;import android.util.AttributeSet;import android.view.MotionEvent;import android.view.ViewGroup;import android.widget.Scroller;public class MyViewPager extends ViewGroup { private Scroller mScroller; public MyViewPager (Context context) { this (context, null ); } public MyViewPager (Context context, AttributeSet attrs) { this (context, attrs, 0 ); } public MyViewPager (Context context, AttributeSet attrs, int defStyleAttr) { super (context, attrs, defStyleAttr); mScroller = new Scroller (getContext()); } @Override protected void onLayout (boolean changed, int l, int t, int r, int b) { int childCount = getChildCount(); int width = r - l; int height = b - t; for (int i = 0 ; i < childCount; i++) { getChildAt(i).layout(width * i, 0 , width * (i + 1 ), height); } } private float lastX; @Override public boolean onTouchEvent (MotionEvent event) { switch (event.getAction()) { case MotionEvent.ACTION_DOWN: lastX = event.getX(); break ; case MotionEvent.ACTION_MOVE: { float currX = event.getX(); float distance = lastX - currX; int currScrollX = getScrollX(); int scrollX = (int ) (currScrollX + distance); int right = (getChildCount() - 1 ) * getWidth(); if (scrollX < 0 ) { scrollX = 0 ; } else if (scrollX > right) { scrollX = right; } scrollTo(scrollX, getScrollY()); lastX = currX; } break ; case MotionEvent.ACTION_UP: { int scrollX = getScrollX(); int childIndex = (int ) ((float ) scrollX / (float ) getWidth() + 0.5 ); smoothScrollTo(childIndex * getWidth()); } break ; } return true ; } private void smoothScrollTo (int destX) { int scrollX = getScrollX(); int distanceX = destX - scrollX; mScroller.startScroll(scrollX, 0 , distanceX, 0 , 250 ); invalidate(); } @Override public void computeScroll () { if (mScroller.computeScrollOffset()) { scrollTo(mScroller.getCurrX(), mScroller.getCurrY()); postInvalidate(); } } }
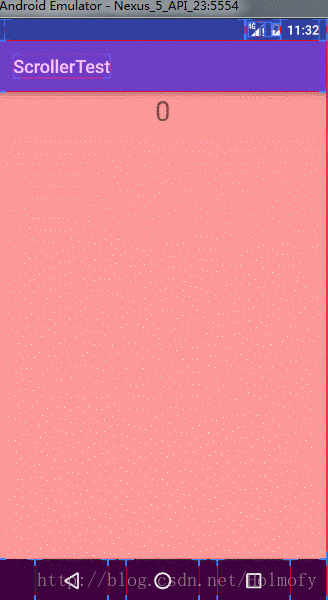
运行效果图:
扩展 1、你会发现在这里我们并没有像ViewPager一样自定义一个PagerAdapter适配器,来统一管理各个子页面。ViewPager这样做是为了防止开发者通过xml布局文件自己设置子页面的宽高,上一节中我们讲到开发者通常无法自己去设置left,top,right,height,width,height属性,在这个示例中,你会发现MyViewPager下的子控件宽高无法指定为确定的值,那是因为在xml实例化所有的控件后,MyViewPager会通过onLayout方法中重新对各个子控件进行重新布局。如果你有兴趣继续封装自己的ViewPager类你可以实现一个PagerAdapter。View的事件分发机制(这里也写了一片文章,供大家参考) ,所以我们的MyViewPager适合做一些简单的滑动效果(比如第一次启动时的滑动界面,轮播图效果等,使用ViewPager实现就太浪费了),内部嵌套的控件不能完成一些复杂的操作。
1
2
3
4
5
6
7
8
9
10
11
12
13
14
15
16
17
18
19
20
21
22
23
24
25
26
27
28
29
30
31
32
33
34
35
36
37
38
39
40
41
42
43
44
45
46
47
48
49
50
51
52
53
54
55
56
57
58
59
60
61
62
63
64
65
66
67
68
69
70
71
72
73
74
75
76
77
78
79
80
81
82
83
84
85
86
87
88
89
90
91
92
93
package cn.hufeifei.scrollertest.view;import android.content.Context;import android.util.AttributeSet;import android.view.MotionEvent;import android.view.ViewGroup;import android.widget.Scroller;public class MyViewPager extends ViewGroup { private Scroller mScroller; public MyViewPager (Context context) { this (context, null ); } public MyViewPager (Context context, AttributeSet attrs) { this (context, attrs, 0 ); } public MyViewPager (Context context, AttributeSet attrs, int defStyleAttr) { super (context, attrs, defStyleAttr); mScroller = new Scroller (getContext()); } @Override protected void onLayout (boolean changed, int l, int t, int r, int b) { int childCount = getChildCount(); int width = r - l; int height = b - t; for (int i = 0 ; i < childCount; i++) { getChildAt(i).layout(0 , height * i, width, height * (i + 1 )); } } private float lastY; @Override public boolean onTouchEvent (MotionEvent event) { switch (event.getAction()) { case MotionEvent.ACTION_DOWN: lastY = event.getY(); break ; case MotionEvent.ACTION_MOVE: { float currY = event.getY(); float distance = lastY - currY; int currScrollY = getScrollY(); int scrollY = (int ) (currScrollY + distance); int bottom = (getChildCount() - 1 ) * getHeight(); if (scrollY < 0 ) { scrollY = 0 ; } else if (scrollY > bottom) { scrollY = bottom; } scrollTo(getScrollX(), scrollY); lastY = currY; } break ; case MotionEvent.ACTION_UP: { int scrollY = getScrollY(); int childIndex = (int ) ((float ) scrollY / (float ) getHeight() + 0.5 ); smoothScrollTo(childIndex * getHeight()); } break ; } return true ; } private void smoothScrollTo (int destY) { int scrollY = getScrollY(); int distanceY = destY - scrollY; mScroller.startScroll(0 , scrollY, 0 , distanceY, 250 ); invalidate(); } @Override public void computeScroll () { if (mScroller.computeScrollOffset()) { scrollTo(mScroller.getCurrX(), mScroller.getCurrY()); postInvalidate(); } } }
效果图