字节流
字节流就是每次以8位一个字节的方式执行输入输出。所有字节流都继承自InputStream或OutputStream,包括字符流在内的所有类型的I/O流都是基于字节流构建的。
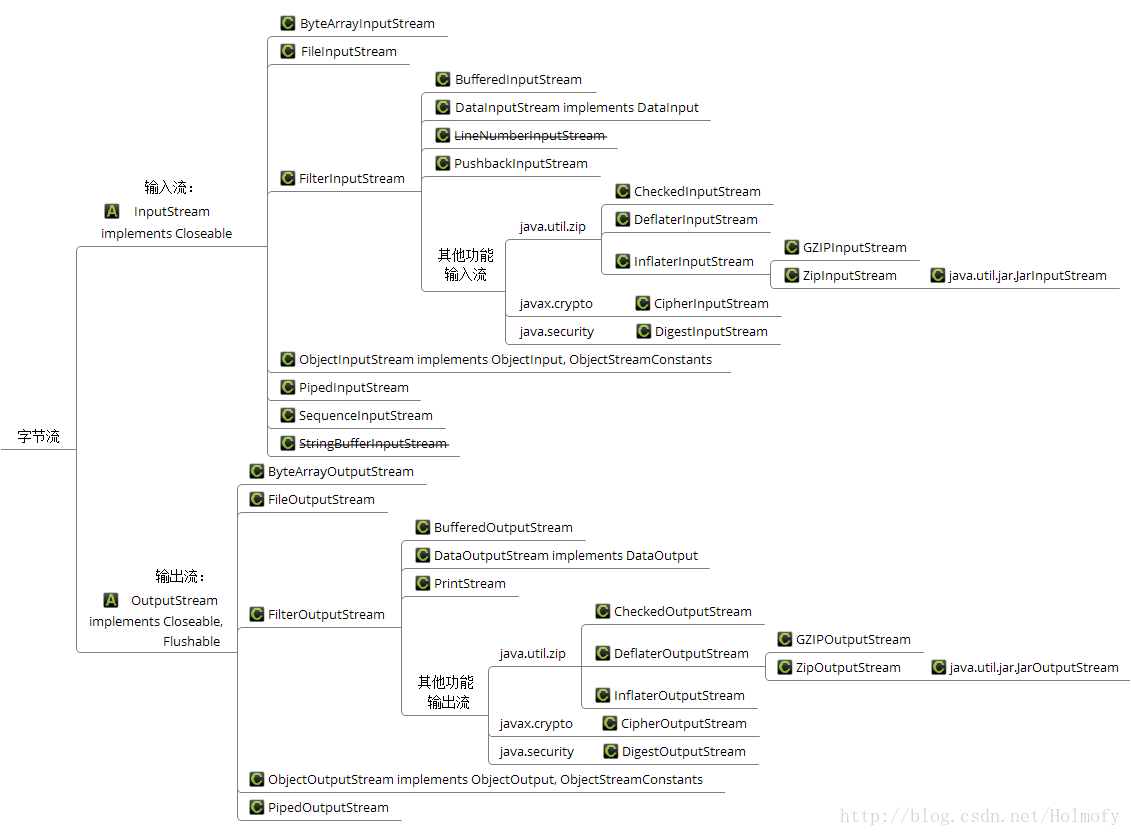
字节输入流InputStream
字节输入流基本上都需要实现InputStream这个抽象类的方法:
| 方法摘要 | 备注 |
|---|---|
| public abstract int read() throws IOException; | 单字节的方式读取,返回值在0~255之间,如果返回-1表示读取结束。 |
| public int read(byte b[], int off, int len) throws IOException; | 通过调用read()方法逐字节地读取。返回值表示读取的字节数,该值一定小于等于b数组的长度,返回-1表示读取结束。 |
| public int read(byte b[]) throws IOException; | 直接调用read(b, 0, b.length)方法。 |
| public long skip(long n) throws IOException | InputStream默认使用read进行读取来实现跳过n个字节 |
| public int available() throws IOException; | 返回流中可读的字节数,InputStream默认实现返回0。 |
| public void close(); | 关闭流释放资源。InputStream默认提供空实现。 |
| public boolean markSupported(); | 该流是否支持标记。InputStream默认返回false。 |
| public synchronized void mark(int readlimit) | 标记当前读取的位置,使用reset可以恢复到标记位置。InputStream默认提供空实现,数组输入流和缓冲流实现了该功能。 |
| public synchronized void reset() throws IOException; | 恢复到mark标记的位置。InputStream默认抛出异常,缓冲流如果超出readlimit也会抛出异常。 |
字节输出流OutputStream
字节输出流基本上都需要实现OutputStream这个抽象类的方法:
| 方法摘要 | 注意事项 |
|---|---|
| public abstract void write(int b) throws IOException; | int长度为32位,该方法会忽略高24位,只写入低8位。 |
| public void write(byte b[], int off, int len) throws IOException; | 调用write(b)方法逐字节写入。 |
| public void write(byte b[]) throws IOException; | 直接调用write(b, 0, b.length)方法写入。 |
| public void flush() throws IOException; | 强制将缓冲区内容写入。OutputStream默认提供空实现,一般对有缓冲的输出流才有效。 |
| public void close() throws IOException; | 关闭流释放资源。OutputStream默认提供空实现,如果缓冲关闭前会调用flush方法。 |
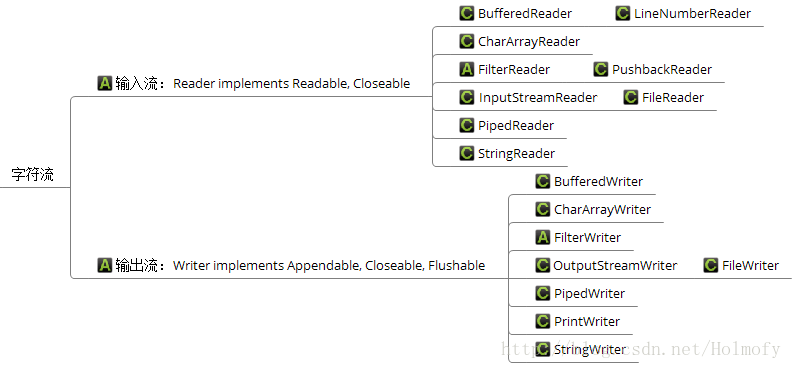
字符流
字符流通常是字节流的“包装器”,所有的字符流都继承自Reader和Writer这两个抽象类。字符流底层仍然是使用字节流来执行物理I / O。
字符转换流
前面提到了字节流和字符流,通常我们需要将字节流转换成字符流,而处理字节流到字符流的转换通常使用InputStreamReader和OutputStreamWriter。事实上看类的命名也可才出其作用:
- InputStreamReader用于将字节输入流转换成字符输入流
- OutputStreamWriter用于将字节输出流转换成字符输出流
比如说FileReader和FileWriter,其实这两个类什么也没干,仅仅是将FileInputStream包装成InputStreamReader,将FileOutputStream包装成OutputStreamWriter。也就是说:
| 字符流 | 等价包装 |
|---|---|
| new FileReader(“in.txt”) | new InputStreamReader(new FileInputStream(“in.txt”)) |
| new FileWriter(“out.txt”) | new OutputStreamWriter(new FileOutputStream(“out.txt”)) |
缓冲流
为什么要有缓冲流?
如果使用无缓冲的I/O,这意味着每次读写请求都由底层操作系统直接处理。这个效率是非常低的,因为每次这样的请求通常会触发磁盘访问,网络IO或其他相当耗时的操作。举个例子:大部分磁盘都是使用扫描算法实现磁盘调度,而且磁盘的读写以扇区为基本单位,一个扇区为512字节(新硬盘是4KB),直接使用FileInputStream(或FileOutputStream)的进行小份量的读(写),将会导致磁头在一次扫描的过程中只读取一小部分的数据,如此反复以往,将会降低磁头的扫描的效率。
为了减少这种开销,Java提供了缓冲I/O流,每次读取(写入)请求都是从缓冲区中读取(写入)的,当缓冲区为空(已满)才会调用底层API进行读(写)操作。
JDK中的缓冲流
我们可以使用I/O流包装类将无缓冲的I/O流包装成相应的缓冲流。这样的包装类有四个:
- 字节流:BufferedInputStream,BufferedOutputStream。
- 字符流:BufferedReader,BufferedWriter。
比如:
1 | // 字节流 |
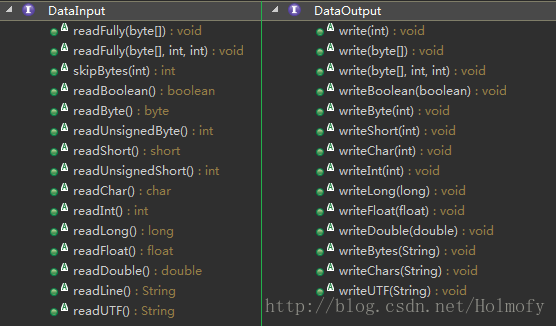
数据流
数据流支持基本数据类型( boolean,char,byte, short,int,long, float和double)以及字符串(String)类型的读写。所有的数据读写流都实现了DataInput或DataOutput接口,JDK相应地提供了DataInputStream和DataOutputStream这两个实现类。
和缓冲流一样,DataInputStream和OutputStream都是包装流,并且只能包装字节流。
示例:
1 | // 这里先把文件流包装成缓冲流,然后在包装成数据流 |
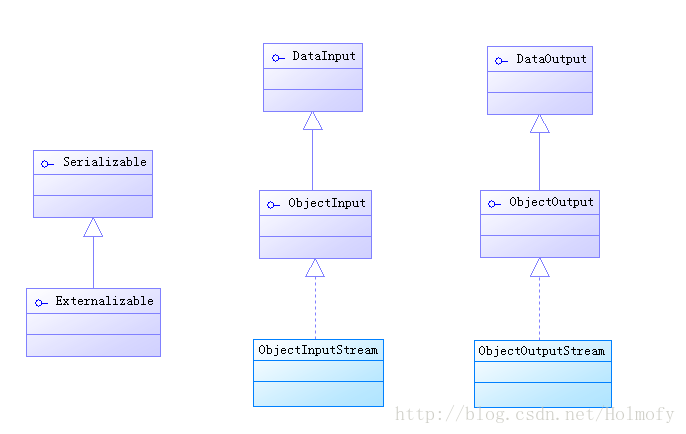
对象流与序列化
前面提到使用DataInputStream和DataOutputStream对基本的数据类型进行读写操作。但是对于Java而言,大多数时候我们遇到的都是Java对象。这个时候就要使用对象流来对对象进行序列化或反序列化。
对象流都实现了ObjectInput或ObjectOutput接口,Java提供给我们两个相应的实现类ObjectInputStream和ObjectOutputStream来进行对象的I/O操作,需要注意我们序列化的对象类需要实现Serializable接口。Serializable接口没有任何方法,只是用来标识该对象能够序列化。相应的还有一个Externalizable接口,用于自定义可继承类的序列化。
对象的序列化与反序列化是一个很深的话题,这篇文章长度有限,想继续深入的朋友可以参考对序列化和反序列化和Java的序列化与反序列化这两篇文章
标准I/O流
以前学C++的时候,在iostream中声明了std::cin,std::cout,std::cerr,std::clog。这几个变量分别代表标准输入流,标准输出流,标准错误输出流,标准日志输出流。在Java中也有几个类似的流,它们都是System类的静态变量:System.in,System.out以及System.err,这些对象是由Java平台初始化的流对象,不需要再打开。
通常标准输入流默认是键盘的输入,标准输出流和标准错误输出流默认是输出到显示屏上。
看一下这三个流对象的声明:
1 | public final static InputStream in = null; |
看到这个定义,大家肯定和我一样好奇,final类型修饰的变量初始化为null,之后怎么能用呢?
看一看System类的静态初始化代码段:
1 | /* register the natives via the static initializer. |
系统加载System类时会调用registerNatives这个native方法,重点在registerNatives方法的注释,注释中说registerNatives方法底层会调用initializeSystemClass来完成类的初始化。
看看initializeSystemClass方法的关键代码:
1 | private static void initializeSystemClass() { |
setIn0,setOut0,setErr0方法都是native方法,底层使用C/C++实现。霸道C++的const_cast关键字可以将常量重定向,所以我们完全可以不追究Java中final类型的怎么能够从新设定值。
而且我们从这段代码中可以看出:System.in是BufferedInputStream对象。
标准流的重定向
上面说道System.in,System.out,System.err三个标准流的初始化使用了setIn0,setOut0,setErr0方法。System类还将这三个方法提供了调用接口给我们。
1 | public static void setIn(InputStream in) { |
使用这三个方法我们能够对标准流进行重定向。
说了这么多,可能还有人不了解流重定向到底是什么概念。
学过UNIX,Linux或者玩过Windows命令行的人可能很清楚,我们常用>或>>将程序的打印内容输出到文件中,甚至用<将文件内容作为程序的输入。看到这,或许你会联想到C++的HelloWorld程序std::cout<<"Hello World!"<<std::endl;,C++就形象地使用了<<来表示流操作符。
额,扯远了→_→。总而言之:流的重定向就是将原来的应该输出的内容输出到其他地方。
举个例子:
1 | // 标准输出流重定向 |
标准流的格式化输入输出
对于上面的System.out这个对象,我们肯定非常熟悉,System.err对象和System.out对象是相同类型的对象,用法也就不用多说了,但是System.in这个对象用的就相对少很多了。前面我们对标准输入输出流进行了简单的剖析,我们已经知道System.in是个BufferedInputStream对象,很明显我们要想从中读取基本数据类型( boolean,char,byte, short,int,long, float和double)以及字符串(String)类型肯定相当麻烦。这个时候我们可能会想到使用DataInputStream这个类来对其进行包装。
1 | DataInputStream in = new DataInputStream(System.in); |
是个不错的想法,可惜并不可靠,比如下面这个程序:
1 | DataInputStream in = new DataInputStream(System.in); |
这个时候你输入一个100再敲一下回车,你可能会得到825241613的输出。为什么呢?
我们将825241613转换成16进制:0x3130300D,31是字符1的ASCII码值,30是字符0的ASCII码值,0D是\r也就是回车的ASCII。看到这我们明白了:不能用一个字节流去读一个字符流。
那我们可以使用InputStreamReader将它转成字符流。很显然使用Reader的read方法过于复杂,需要我们自己实现解析。
下面我们来介绍一个工具类。
Scanner扫描工具处理格式化输入
需要注意Scanner类并不是I/O流。它是java.util包下的一个专门用来扫描文本数据的工具类。
Scanner使用正则表达式来解析任何可读取的对象中的数据。
它有以下的构造函数:
1 | public Scanner(java.lang.Readable source); |
创建Scanner对象后,每次读取的数据都会将数据缓存在一个java.nio.CharBuffer字符缓冲区中,我们可以对其读取方式进行查看或重新设置:
| 查看属性 | 设置属性 |
|---|---|
| Pattern delimiter() | Scanner useDelimiter(Pattern pattern) 或 Scanner useDelimiter(String pattern) |
| Locale locale() | Scanner useLocale(Locale locale) |
| int radix() | Scanner useRadix(int radix) |
这些属性对应的意义以及默认值分别如下:
| 属性 | 属性的意义 | 默认值 |
|---|---|---|
| locale | 不同地区解析字符的方法不同 | Locale.getDefault(Locale.Category.FORMAT) |
| delimiter | 每次读取的分界符 | 任意空白字符 |
| radix | 遇到数组使用多少进制进行解析 | 10 |
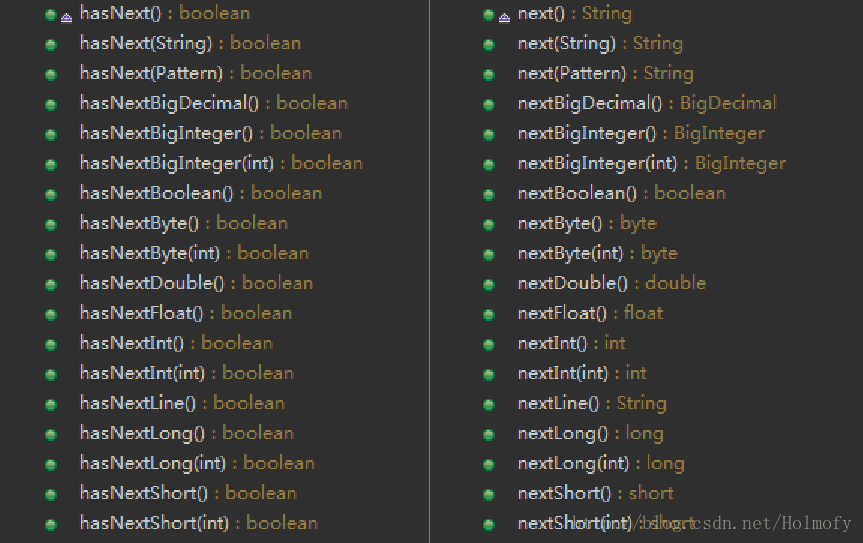
| 我们还可以调用hasNextXxx()方法来查看有没有指定类型的数据,用NextXxx()方法来获取相应类型的数据。 |
1 | package cn.hff.io; |
输出结果:
1 | 255 |
不得不说Scanner是个功能强大的类。
有了上面所说的这些功能,我们就可以使用Scanner随心所欲的操作System.in流了。
1 | package cn.hff.io; |
控制台输入与输出的结果:
1 | Hello |
StreamTokenizer与StringTokenizer
除了Scanner这个牛逼的工具,还有StreamTokenizer和StringTokenizer这两个专门进行字符解析的工具。
前者专注于输入流,后者专注于字符串。
这两个类可以用来做单词统计之类的工作。不过这两个类这方面的能力也不是很强,很鸡肋。
PrintStream和PrintWriter打印流处理格式化输出
刚说完格式化输入,现在讲讲格式化输出吧!
我们前面提到了System.out标准输出流,它是一个PrintStream对象,它本身就是一个格式化输出流对象。
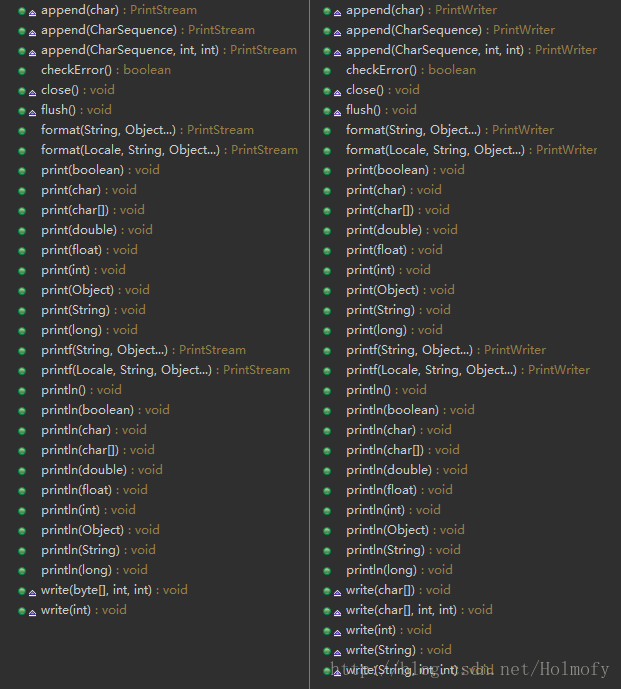
所以我们不需要进行任何包装等操作就可以直接使用。另外还有一个和PrintStream功能很类似的类PrintWriter。这里对PrintStream和PrintWriter进行区别。事实上这两个类源码的80%以上都是一样的,功能上基本上是重复的,我也不知道为什么JDK中会有两个功能基本相同的类,因为这两个类之间的区别完全无关痛痒:
如果这两个类创建对象时都指定了autoFlush参数(默认为false),则PrintStream每次输入的内容中有\n这个换行符就会调用flush方法对缓冲区进行强制输出,而PrintWriter只有调用println,format或printf方法时才会对缓冲区进行强制输出。因为PrintStream继承自FilterOutputStream所以只能对字节流进行包装,而PrintStream继承自Writer所以它不仅能包装字节流还能包装字符流(这个体现在构造函数上)。
标准输入输出流的封装—-Console
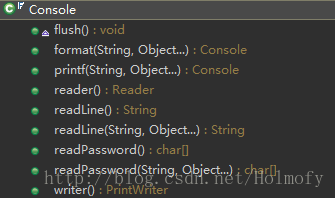
我们前面提到System.in,System.out,System.err这三个标准输入输出流。JDK1.6版本后提供给我们一个类—-Console(控制台),这个类封装了标准输入输出流。我们可以看一下它的构造方法:
1 | private Console() { |
其中reader是对标准输入流的封装,pw和out是对标准输出流的封装,而且这两个流都封装成了字符流,这个比System.in和System.out好用多了。
从构造方法我们这个类我们没法new对象,在上面提到的System类中有一个静态方法System.console()可以获取Console对象。这个类中提供了一下几个方法给我们调用。
数组I/O流
数组I/O流,可以将字节数组(或字符数组)以流的方式来操作。
JDK1.0开始就为我们提供了字节数组输入输出流:ByteArrayInputStream和ByteArrayOutputStream。
JDK1.1有了字符流后,同时提供给我们字符数组输入输出流:CharArrayReader和CharArrayWriter。
ByteArrayInputStream
这个类继承自InputStream。我们可以将字节数组作为参数来构造它。有了这个类,我们读取字节数组的时候,就可以不用自己去设计一个pos来标识我们读到了哪里,也不用担心pos标志位被程序的某个地方无意的修改了,因为ByteArrayInputStream已经完全为我们封装好了。
ByteArrayOutputStream
这个类继承自OutputStream。我们可以把它理解成
Vector<byte>来使用,当然Vector不能直接放入byte,因为Java的Vector和ArrayList等集合类型底层保存数据都是使用Object数组,这就导致8种基本数据类型必须经过装箱操作才能保存到集合数组中,如果对大批量的数据进行拆装箱操作,这效率影响不言而喻。而ByteArrayOutputStream这个类直接使用byte[]来保存数据,并且能够自动扩容,扩容策略和Vector一样int newCapacity = oldCapacity << 1;。如果你想把这字节数组中的内容转成字符串可以直接调用这个类的toString方法。注意:ByteArrayInputStream和ByteArrayOutputStream的操作都是线程安全的,相应地,它们在单线程下的效率不是很高。
CharArrayReader
这个类继承自Reader。与ByteArrayInputStream功能一致,区别在于CharArrayReader读取的是字符数组的内容。
CharArrayWriter
这个类继承自Writer。与ByteArrayOutputStream功能一致,区别在于CharArrayWriter写入到字符数组中。
注意:CharArrayReader和CharArrayWriter的方法也是线程安全的
字符串I/O流
与CharArrayReader类似的还有一个StringReader,可以以流的方式来读取字符串的内容。JDK1.1设计了设个类之后,原本的StringBufferInputStream就被替代了。
相应地,和CharArrayWriter对应的也有一个StringWriter,可以以流的方式来将字符或字符串写入到一个StringBuffer中。
CharArrayReader|CharArrayWrite和StringReader|StringWriter的相同点与不同点:
- 都可以以流的方式对字符序列进行操作,CharArrayReader|CharArrayWrite对
char[]进行操作;而StringReader对String进行操作,StringWrite对StringBuffer进行操作。- 两者都是线程安全的,这四个类在读写操作时都使用
synchronized关键字进行了同步(StringWrite由于使用StringBuffer实现,所以不需要同步)。- CharArrayWriter自己实现自动扩容,扩容策略为:
newLength = Math.max(buf.length << 1, newcount);以两倍的方式进行扩容;StringWriter使用StringBuffer实现,扩容策略依赖于StringBuffer:int newCapacity = value.length * 2 + 2;。
这几个类效率低,而且可以直接使用StringBuilder或StringBuffer来实现类似的功能,所以使用频率比较少。
管道I/O流
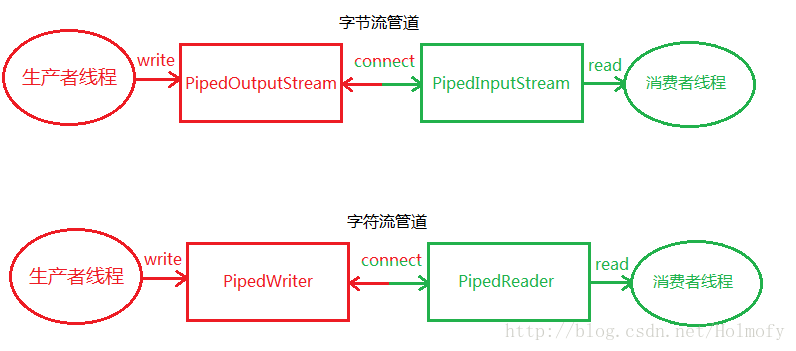
管道流的主要作用是可以进行两个线程间的通讯。
JDK同样提供给我们两种管道I/O:
- 字节管道I/O流:PipedInputStream和PipedOutputStream。
- 字符管道I/O流:PipedReader和PipedWriter。
示例:
1 | package cn.hff.io; |
回退输入流
使用回退流对其他输入流包装后,我们不仅可以从流中读取数据,还可以往流中回写数据。当然这里说的回写仅仅是将数据写入到回写流的内存缓冲区,而不是写入输入源。
JDK中提供了两个回写输入流:
- 回写字节流:PushbackInputStream。
- 回写字符流:PushbackReader。
回写输入流在普通I/O流的基础上提供了一下三个方法,使用这三个方法我们就可以往输入流中回写数据了:
| 回写字节流 | 回写字符流 |
|---|---|
| void unread(int b) | unread(int c) |
| void unread(byte[] b, int off, int len) | void unread(char cbuf[], int off, int len) |
| void unread(byte[] b) | void unread(char cbuf[]) |